Saturday

Meandering Tablet Weaving

Note: this draft of a blog post has been sitting for quite some time. These bands were done in August or earlier, and some have been sold already. I wanted to add links, but I unfortunately can't find the time! We've been back and forth to the hospital with both my sons, and sadly my oldest is still in there :( I've become completely unreliable at doing anything in a timely manner! But my sons are worth it!

I keep waiting for a "break" from my daily happenings. And I do get a few here and there, and I quickly set up my backstrap tablet weaving project to weave a few rows. But both my kiddos have the cold virus with croup. We've never had croup before, and wow, it's terrible. So weaving time is out. I hope to catch up on reading, writing back, and a couple blog posts that have been sitting in draft for awhile.

Morning Weaving the first of my images that I saw at Pinterest! Whoop!

I thought I better get this blog post started because, for the first time, someone pinned one of my images to Pinterest. I hadn't started pinning my images yet, for I didn't think I had enough readers, but two individuals actually shared my photo on Facebook, one person I don't know, but I am sending a thank you to Annie for sharing (as I suspect that may have led to pinning, lol!).

But before I get into the details, I have to tell you I was about to give up on Facebook, for my weaving and my personal page. I don't want to install another app for messaging, and I rarely use the laptop/home computer (I would have to wait on line for a turn, lol). I've stopped using twitter (need to delete that permanently) because I could not figure out how to "use" it. I made my Instagram account private, as I watched Instagram delete people's for apparently no reason, and now I rarely accept new people unless I recognize their name from somewhere. Generally, I find Facebook a time waster (no offense), but there is one group that saved me from giving up.

The Historical Tablet Weaving Group is, well, downright awesome. Most everyone is a happy bunch, and it is fantastic seeing everyone's weaving and learning. And if you're looking to weave something historical accurate in certain time period, this is a great place to start.

Anyway, that's about it for my technical updated! Almost everyone is done with their withdrawal from me cutting off the cable tv in our home!

.kivrim/running dog.

I wanted to actively start doing what I call two-pack tablet weaving. One pack moves one direction, the other moves in the opposite. What better place to start than with Kivrim (I affectionately call it meandering) and Rams Horn variations. And wow, the sky is the limit for patterns on the internet.

.running dog/kivrim, in wool.
.running dog/kivrim, in cotton.

I started with a basic Kivrim often called Running Dog. Then I moved onto the classic Rams Horn, and then it's variations. I used this opportunity to sample the following yarns: size 10 crochet cotton, sabanilla weight churro wool, Shetland fingering weight wool, peruvian fingering weight wool. Out of all these yarns, the Shetland did not work out for me on my Inkle loom. And yes, all of these were done on Inkle.

The surprise for me was adapting a John Mullarkey variation, and, wow, it came out spectacular. This was not something I could have predicated, and this is the band that is now floating around the web. This band will be available as a key fob shortly.

What I learned: I love doing two-pack weaving!

And lastly, if you become a member of TWIST, there are a wonderful selection of articles and drafts available.


Sunday

Double Woven Tablet Band - SZ Threading - Sample #3

As much as I've tried to stay away from "weaver speak" I had learn quite a bit to move forward in my tablet weaving. Warning (laugh), this post will get into "weaver speak" and I pre-apologize for any confusion, and welcome any questions, as this helps me to keep learning.

Continuing the year of learning for me, I admit that tablet weaving had been one of the simpler, mindless (in a way of its repetitiveness) weaving processes I've done. Until now, I've mostly done the 4 turns toward, 4 turns away type of bands. And these could go on forever, just in color combinations alone, the possibilities are endless.

I've always admired some of the more complex structures, and have tried a few over the years, managed to weave a couple, but not really knowing how the heck I did them. Somehow, they just came out.

When Interweave Store had one of their super sales, I decided to purchase John Mullarkey's Tablet Weaving Videos: Tablet Weaving Made Easy and Double Faced Tablet Weaving.

my double faced weave sampler based off john mullarkey's video

I can't tell you how much I really love these videos! I have them on my iPad, and it is just like having access to a classroom anytime. If I get confused, I can go to the appropriate section and refresh myself with the material. John Mullarkey is an excellent teacher (I was fortunate to sit in on one of his lectures at Convergence Albuquerque, where I also met Laverne Waddington, Linda Hendrickson, and a few others. At that time I was deep into Navajo Weaving, and just starting to become interested in Backstrap Weaving).

Even thou Tablet Weaving Made Easy starts you from stratch, I learned a lot, especially in regards to setup on the inkle loom. My Inkle Loom is my go to loom, and the one I can most easily have around my children without disaster (laughing). Just for this aspect alone, tablet weaving on an inkle loom is worth getting the video. Other perks is learning how to design drafts to weave. John Mullarkey also explains things in a way that is easily understandable.

a sampler based off a pattern from linda hendrickson

In the past, when I've tried to do more complex set-ups, I feel what hung me up was "language". Each tablet weaver has their own language. To look up a draft in different resources meant different language, for example, towards, forward, and front can all mean the same thing when applied to the direction of turning tablets. For me, this was incredibly confusing as I moved onto "2 pack" techniques.

Warping my loom as instructed in the Double Faced Tablet Weaving video, I sat and worked thru the first 2 lessons: Doubled Faced All Threaded Z or S and Doubled Faced Threaded SZ. I really, really loved the second lesson, and my mind started whirling with the possibilities.

Searching online, I found some resources at Linda Hendrickson's website, and combined with the video, I moved on to do samplers. My biggest problems were the "language" and learning direction of twist. Once I was able to shift both weavers "language" into my own, my weaving took off.

Here are my goals and notes regarding this project:

Double Woven Tablet Band - SZ Threading - Sample #3

Goals for this project:

1. Using threaded-in tablets and a circular/continuous warp combined on the inkle loom.

2. To be able to identify an S or Z threaded tablet, then arrange them into an SZ order across the warp.

3. Continue practicing SZ Threaded Double Faced Weave.

4. Weaving with 2 tablets on each edge, turned in a consistent direction for selvedge.

5. Use a new brand of yarn (for me), noting how I like it, EPI, PPI, etc.

6. Try various patterrns/motifs.

7. Using either blue or green for the background color and/or weft.

8. Weaving the 2 pick sequence needed for double weave and identifying where I'm at if I stop in the middle of a sequence.

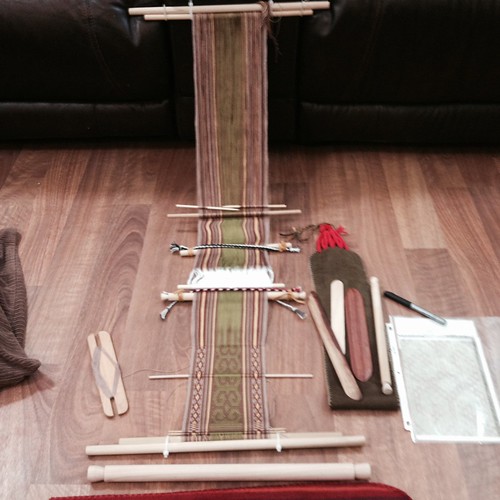
Equipment & Yarn Used:

- Schacht Inkle Loom, Snipes Shuttle

- Bernat Handicrafter (Crochet Thread) Size 5, Blue (@35g) and Green (@25g)

- Graph Paper, Post-it Notes, Pencil, Eraser, Ruler, Cardboard

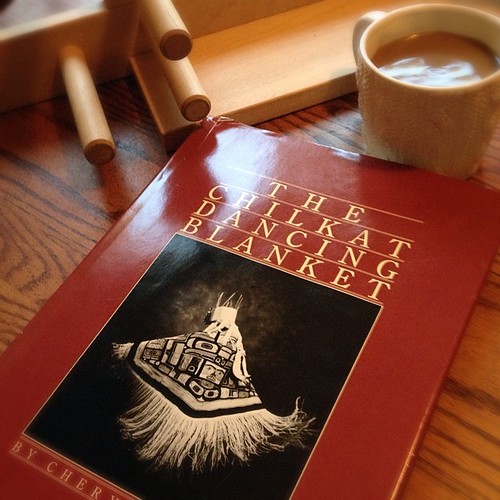
Resources: Tablet Weaving Made Easy Video (John Mullarkey), Double Faced Tablet Weaving Video (John Mullarkey), Tablet Woven Leashes for Spike and Jones (Linda Hendrickson), Double Faced Tablet Weaving (Linda Hendrikson), Tablet Weaving Magic (Otfried Staudgel). Note: I do not own Tablet Weaving Magic yet, but I thought I'd include it here as I have reproduced and altered one of the motifs found in her book.

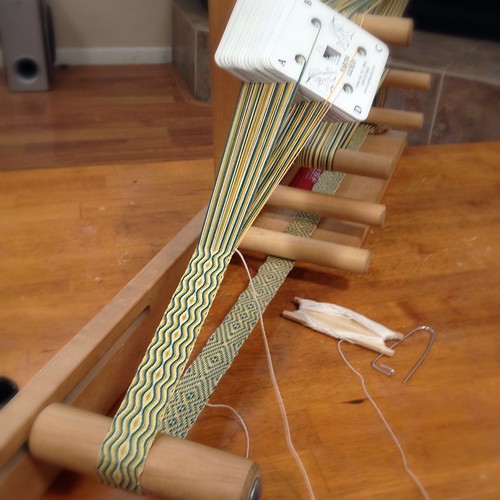
Threading: I threaded all the tablets Z. The first two and last two were threaded-in, all others were done using a continuous warp method found in the Double Faced Tablet Weaving video. Then I rearranged all the tablets to altenate for and SZ threading.

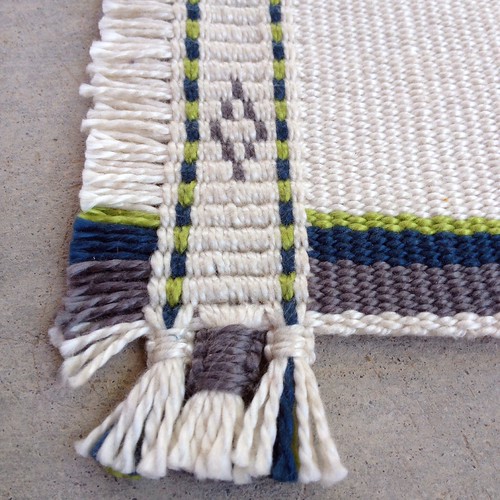
To Start Weaving: Selvedge tablets will always turn in the same direction. The rest of the cards will be woven will the double weave sequence: 2 turns towards and two turns away. Inserted pieces of cardboard for fringe.
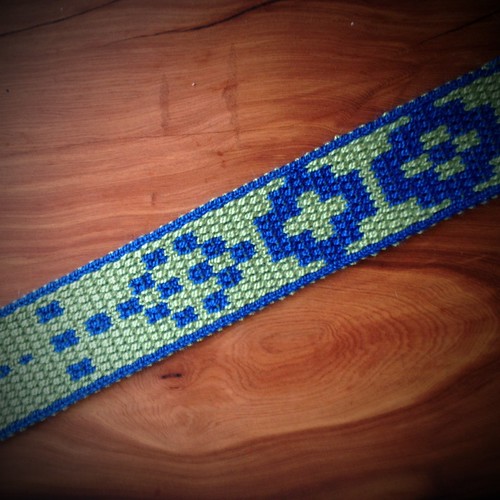
PAW PRINT

The first paw print went great, but when I moved on to the second motif, where the background colors reversed, I became thoroughly confused. I practiced unweaving my mistakes (practice is the kind word, it was more like torture) and somehow managed to weave the second motif, althou I was not entirely clear on what I was doing.
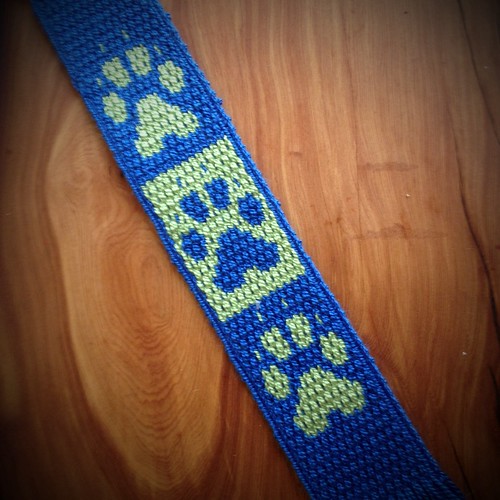
.paw print.

What I learned: Each tablet weaver has their own way or "language" they use to give directions on how to weave a motif, and I need to pay very close attention. What I realized was I needed to firmly understand in this "2 pack" technique which pack was the "background" pack and which was the "pattern" pack, and to choose a fixed position to move these packs into each 2 pick sequence. I know this sounds confusing, but it's the only was I can explain it. Once I firmly understood these conditions, the colors of the weaving (ie blue or green) became a weaving tool that I was turning the packs in the right direction.
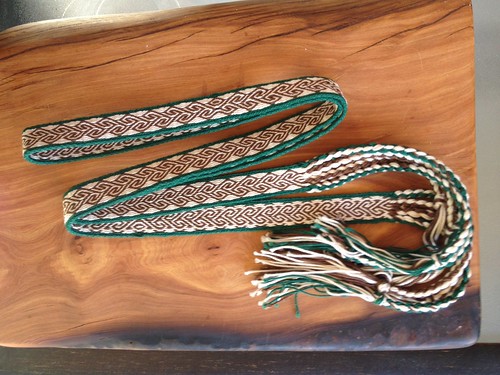
KIMBERLEY

I graphed out my name for a bookmark. To deal with the twist build in the selvedge tablets I decided to change the turning direction. I was concerned this might confuse me, so I noted it on my draft.

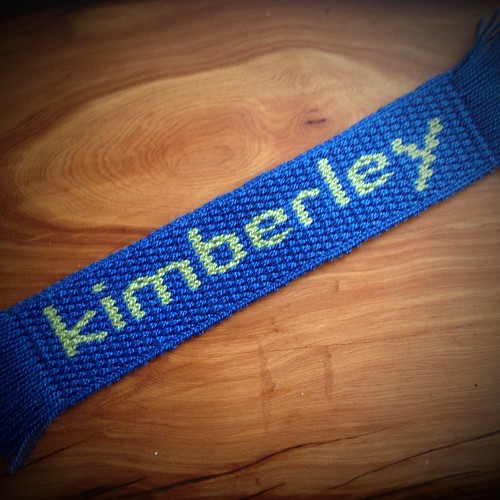
.kimberley bookmark.

What I learned: Weaving my name helped me to continue to learn how to separate out the background and pattern packs into their "fixed" positions, shifting the selvedge tablets to the approriate pack which helped me as an aid in turning direction.
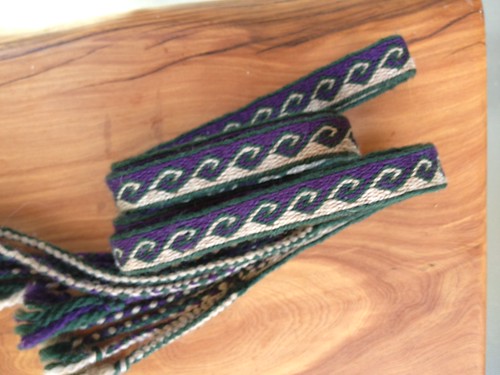
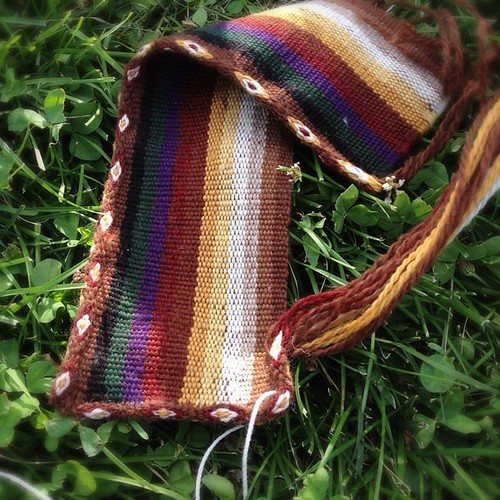
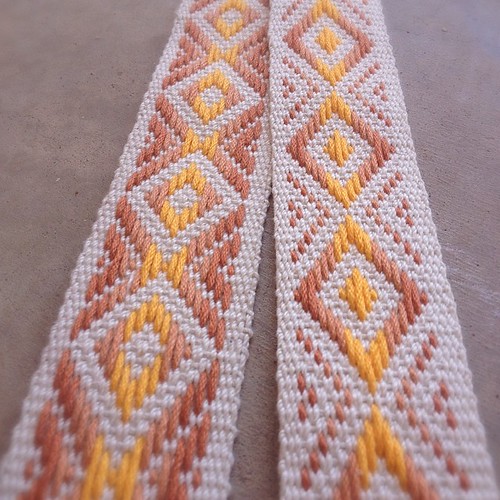
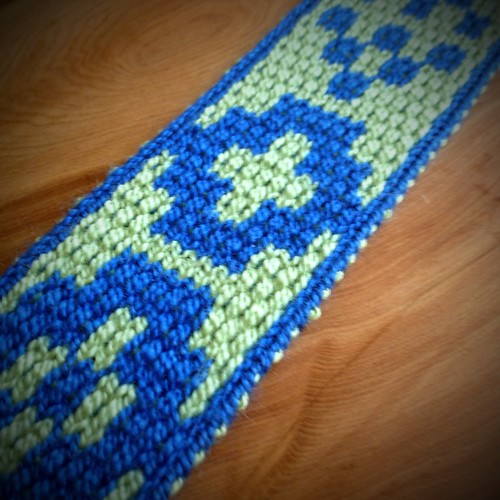
GARRETT

I graphed out Garrett's name, changing the color scheme for the background color and chose to switch to using green weft instead of blue.

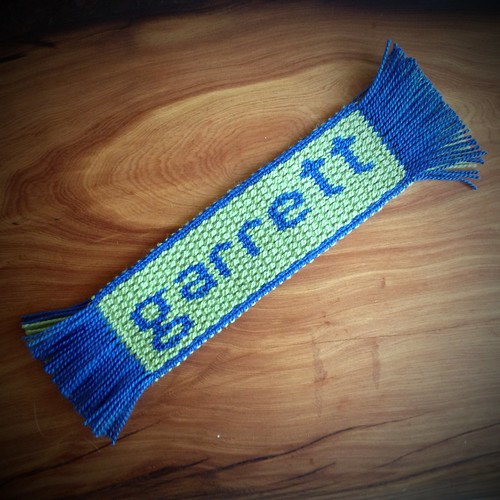
.garrett backpack band.
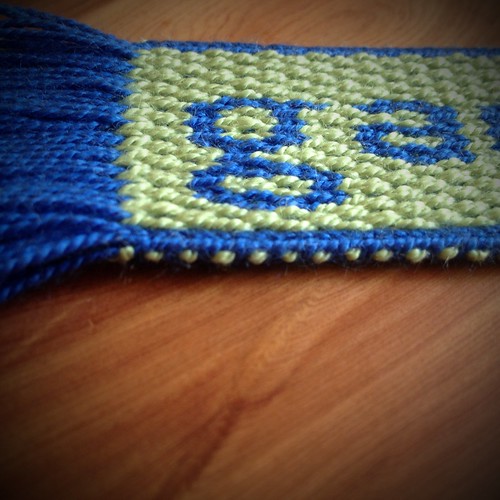
close up of the weft

What I learned: I decided to switch weft colors for 2 reasons: (1) when doing this type of weave a little bit of color can show thru in the weaving, which is fine, but I wanted that color to be all green instead of some blue, (2) I ended up loving the little bead of color along the edge that was produced by the contrasting colors. I was able to weave this segment with no problems, and if I did make an error in turning, I now can succesfully undo my mistake without it being stressful (big smile).

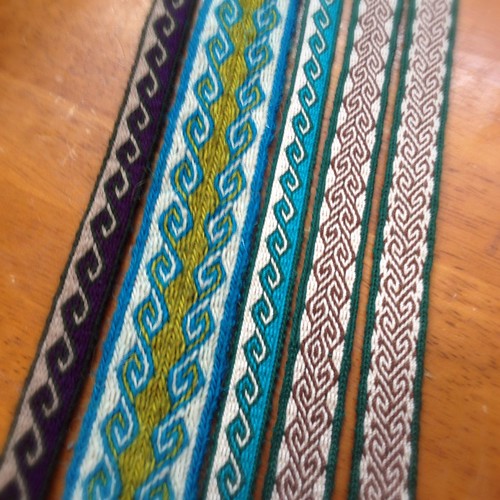
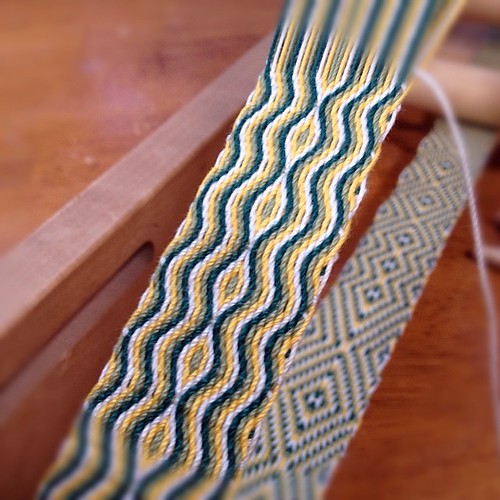
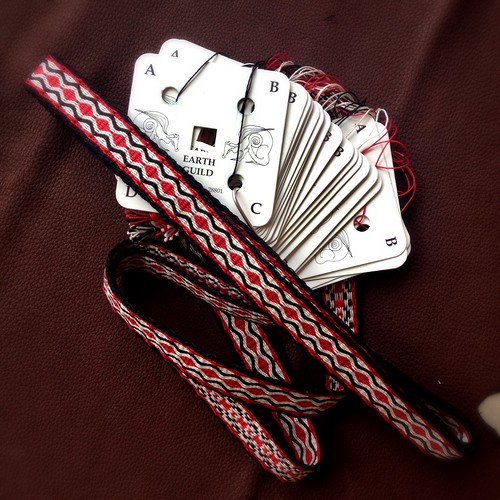
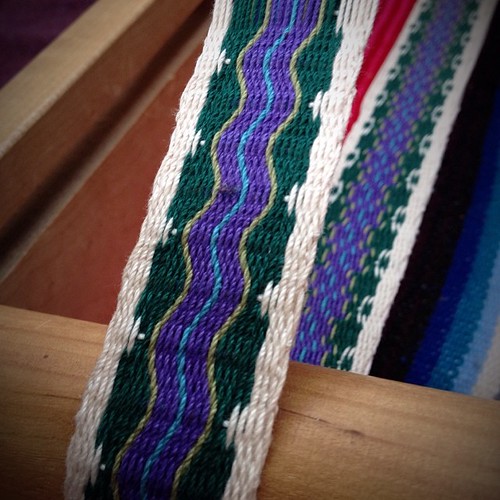
SAMPLE FOR MOTIFS AND TWIST DIRECTION

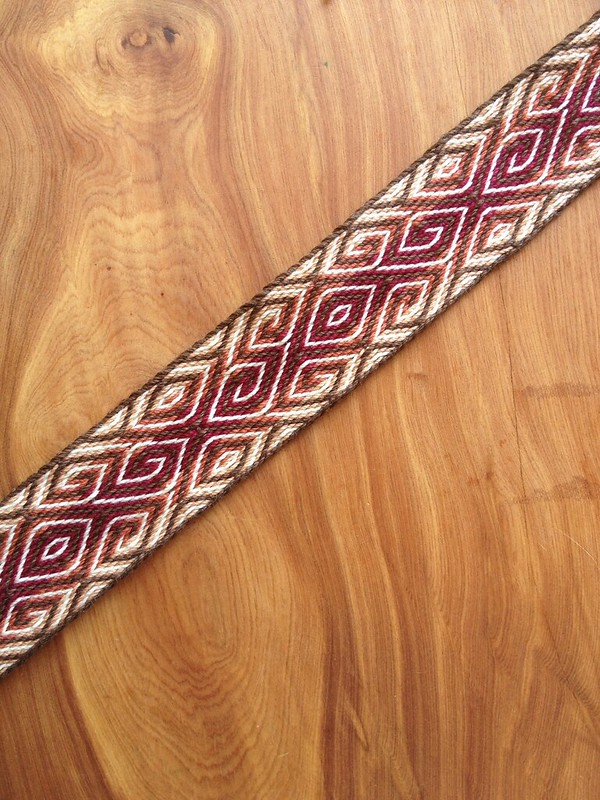
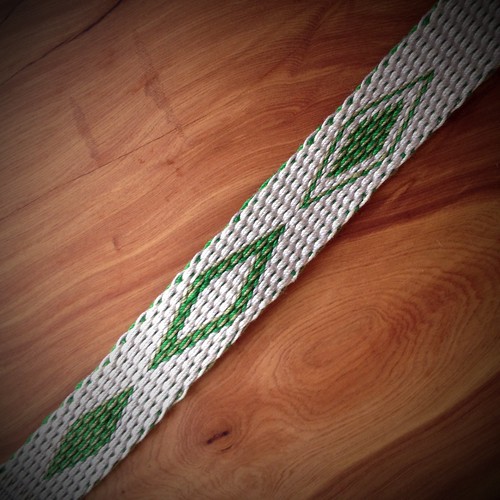
I graphed out a motif from a woven band that Linda Hendrickson did, she noted that the pattern was by Otfried Staudigel.

sampler for direction of twist.

What I learned: Before I started this portion, I went back to the Double Faced Tablet Weaving Video and re-watched the section on determining twist. Again, I can't recommend this video enough. The video was what enabled me to understand what I needed to do to follow my draft. Once I figured out the direction of twist in the woven band, patterns/motifs will come out right. This may sound vague, but I recommend the video as it does a perfect job of explaining this, and if you want to design patterns, this will be essential!
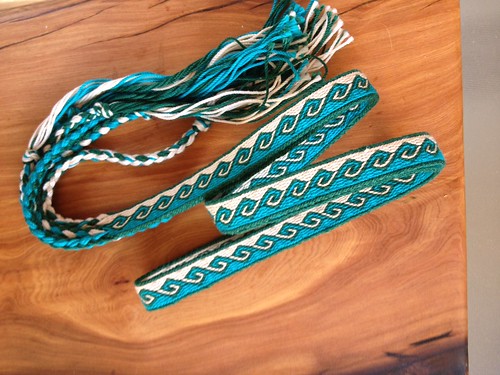
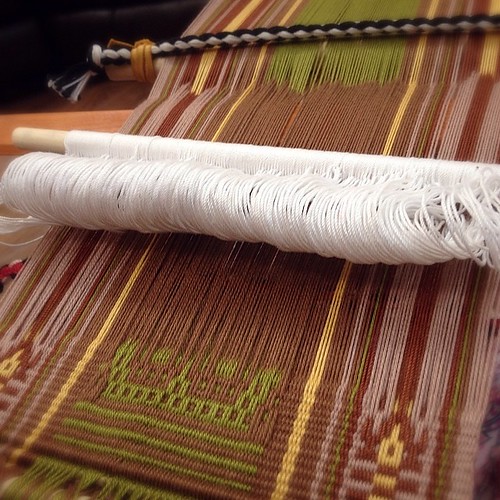
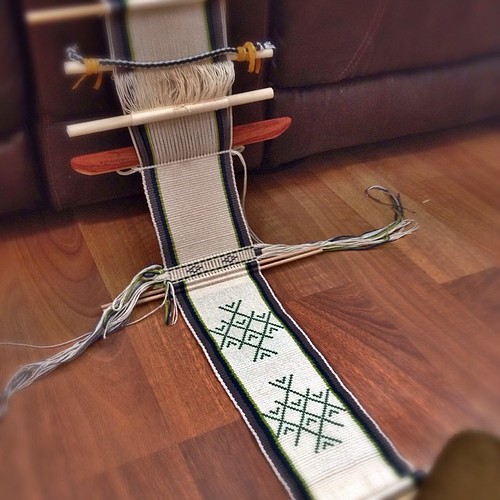
WYATT

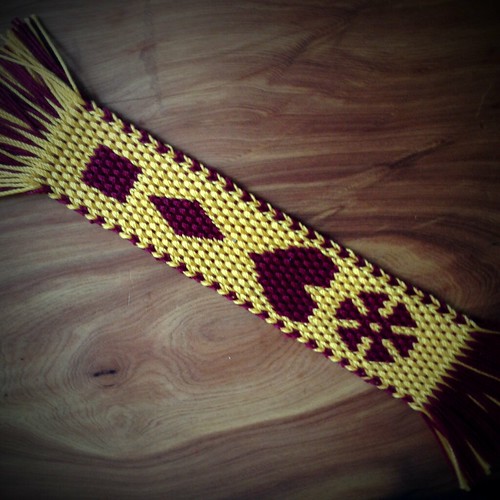
Okay, here comes the fun! This band was a representation of all the goals I listed above.

.wyatt backpack band.

It has threaded-in tablets for the selvedge. I turned those tablets in a continuous direction, shifting them back and forth between the background and pattern packs, using them as an aid for turning direction in conjunction to my written draft.

All the other tablets were strung using continuous/circular warp on the inkle loom. I then repositioned all the tablets in a SZ order. I can now firmly identify an S or Z threaded tablet (smiling).

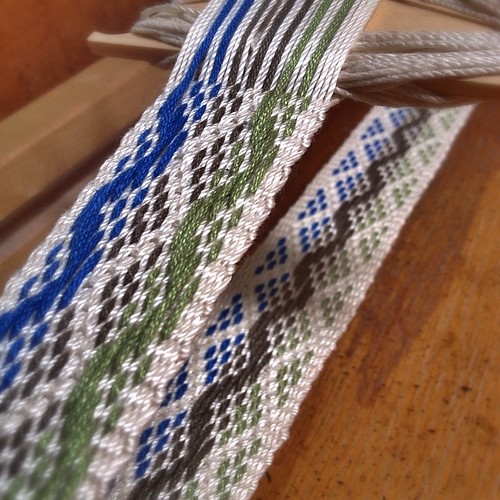
.i am so happy with wyatt's band.

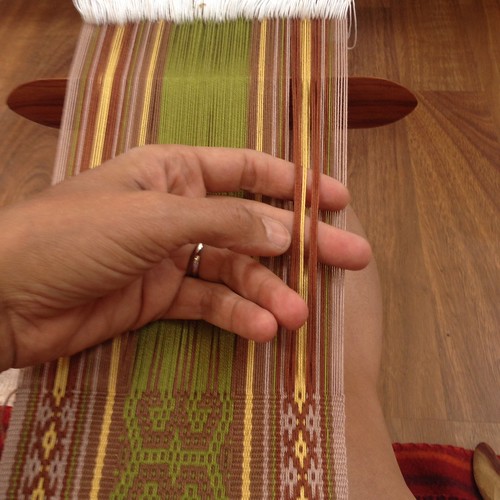
I wove the 2 pick sequence needed for double faced weave, and I'm able to identify by (1) using my charted draft with notes and (2) looking at the position on tablets after 1 pick exactly where I was. This was a biggy for me, to be able to tell by looking at the tablets, and what color yarn was in what hole, where I was in the weaving sequence. It also helped me identify which pack was background/pattern. Everything finally fell together!

I used what I learned about direction of twist in the previous band as I drafted out Wyatt's band. I could now predict the slant/direction of twist which was needed in order for this pattern to work. I didn't mess up!

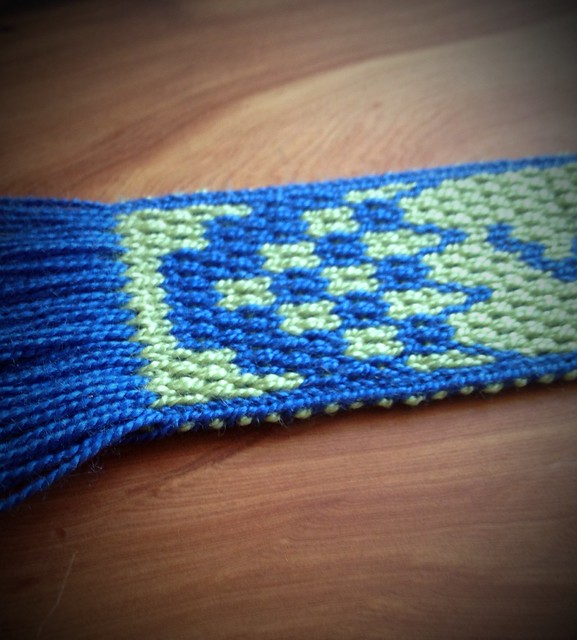
close up of weft and selvedge.

For the weft I choose green again for design purposes, and I got that cool little bead of color along the edge.

And lastly, it didn't kill me to use a yarn with nylon. I typical use 100% cotton, or 100% wool (natural fibers). I don't know how this yarn will wear, it's has this odd fuzzy thing happening, and I think the ends are going to fray quite a bit. I'm not going to bother detailing EPI and such here because if I've learned anything, this can vary dramatically depending on the equipment and the weaver.

I have yet to press these with an iron (I am going to skip washing them), and the bands with my sons' names will be sewn to their school backpacks.

Oh, one more thing, I wove a bit different this time, leaving a loop at the end of each row, and pulled it thru on the next row, it worked better for me.
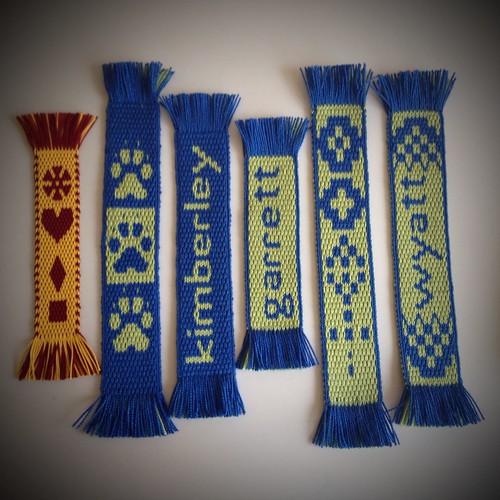
.all the bands.


Monday

Hot Days, Summer Breezes & Monsoon Rains

I have to laugh at myself, after a tough last few months of winter, I had this crazy idea that I would have a lazy summer filled with crafting and cooking!

I must have forgotten for a split second that I have children! Two very, very busy boys that need to be moving, especially my little guy. And interesting things have been happening, and I want to share but alas, I have no time to sit and organize my thoughts. I am hoping to catch up on emails at the end of the week as I will be traveling for a wedding.

And the business of weaving. I really thought I'd have both these backstrap woven projects done by now, but not a chance. I can safely predict that they probably won't be done until September, so you see, no new backstrap projects till then. I have many ideas floating around in my mind, but I don't want to get too many projects started. And I've committed to producing other projects too.

So I'll share some pictures, and well, I'll see you in August :)

Wednesday

Summer Camp At Beauty That Moves


Summer Soul Camp - beautythatmoves.com

In the off chance any of you are reading me out there in the web universe, Heather from Beauty That Moves has opened up registration for her summer camp. I am going to do it! But she is offering the bring a friend option, which drops the price to half! Anyone out there interested in participating? Check out the details here. And let me know!


Tuesday

As The Light Grows

.a little bit of practice tablet weaving on the inkle loom.

Not always by my choice, I've done very little weaving as of late. I have two backstraps in progress, one a sample, and the Inkle loom is dressed, woven with a few rows at a time, when time permits. As my time for weaving started to dwindle, I mostly did sampling, a new wool yarn to try, and practicing nawa awapi.

I'm elated that spring is here, but it's an equally difficult time. My rhythm tells me it's time to stick my hands in the earth, clean out the chicken coop and rabbit shed from the winter, but then I remember, I'm not living that life right now. For a few years now, I've buried those feelings, thoughts, but I desperately need to release them.

.nawa awapi, plain tubular, and dropped warp ribete.

I was speaking to a relative recently. Mostly about life's tides. The fear that hospital stays will come back, thou I deeply feel we are past that frequency. I made a comment that I couldn't have imagined that my life would have taken this odd course, the one without a vegetable garden, not putting up our own food, no rabbits, no chickens, and that dream of having a few sheep, or entertaining goats, has not come back to me. She said, yes, I wouldn't have imagined you where you either, but don't give up.

It's time to let go of what I'm not doing, mind you, I also have a great appreciation for all the thing I've done in the meantime, it does not go unnoticed by me, formost being a mother.

.an ambitious warp that will be a WIP for sometime, I wish I could memorize the pattern.

If I'm honest, I think I would have to say I gave up. Or I would change the goal and say, I will eventually have at least 6 chickens, or, just two rabbits, lol. But, I've come to the realization that I am not quite ready to give up entirely. Something deep within me has shifted and I know the next few years are bringing profound change. I'm not sure it's the change I think I want, but it's coming, and I still want to believe that I have the desire to influence that change.

.on the inkle loom.

That's where I'm at these days, on the cusp of a new shift. The possibility of things to come.

The next two weeks will bring an end to an insane amount of commitments, activities, birthdays, and holidays (sighing in relief). I'm looking forward to a solo trip to Colorado in July for a much awaited wedding. There may even be camping involved, which delights me to no end. I'm ready to spend a few days with the friends that are more family to me than friend. And mostly, to see my sister from another mother (lol) marry an amazing guy!

.a sample, modified Mapuche design.

Let June bring new weaving projects? I hope!


Weft Twining Mini Rug

.mini rug with various types of weft twining.

This is one of two projects woven on the same warp. Intially, I had adapted a supplementary weft pattern to do on this rug, but after about 10 rows, I just didn't like how it was weaving so I took it out and decided to just concentrate on the weft twining.

Before I go on about this project I must share some cuteness......

.loving on the tractor.
.tractor dreaming.
.so so sick he could not move :(

We've spent the whole month with various illness. It's been a bit of bummer! And I thought I was going to get thru it with just a milder version of the stomach flu the kids had, but then we got a cold. The kids are now doing good but I knew something wasn't right with me; I can't walk normal speed without my head feeling like it's going to explode and (laugh) I don't want to weave at all, like not one bit! Well, I have a raging sinus infection, last time I had one like this it was 20 years ago!!!

I finally decided to lift my "ban" on buying books. Honestly our library was so large that each time we moved it was crazy the amount we had. So over the past six years I have either sold or donated books I no longer use, and for the odd purchase I was using my kindle app on my iPad. But the time came around where I "needed" a few books, mostly for weaving. A lot of those books are out of print, but I will share 2 that I purchased on recommendations at Ravelry.

Now back to weaving!

Goals for this project:

1. Continue working on producing a beautifully balanced warped face simple weave with neat selvedges.

2. Use basic weft twining.

3. Use two-color weft twining.

4. Attempt countered twining.

5. Decide how to deal with the weft ends from twining.

Interestingly, I had mentioned on the backstrap weaving group on Ravelry that I have noticed a change in my weaving. I am settling into rhythm and other than making adjustments due to using different brand yarns, I have been able to just settle into the weaving and not have so much anxious thought about how the weaving is going to turn out. I do occasionally take out the ruler just in case, but I really just relax now and weave away. My edges are also turning out better, so happy about that.

.the two projects on my warp, this rug is at the top.

I've been doing basic, one-color weft twining for awhile, generally not doing more than 6 rows. In this project I did a total of 8 rows dispersed in the weft twined band.

Okay, so the fun begins! I did two rows of countered twining dispersed in each band. Had no problem doing it, BUT I do think because I do beat the warp every few rows the detail in the countered twining got compressed (squished). It should look more like a knitted stitch, but compressed it starts to look like two-color twining. It's okay for this project and does bother me but it's interesting to note this for future projects.

The two-color weft twining came out better than I thought it would. I was really aprehensive about that extra twist needed to bring the right color to the surface and how the fabric may change size due to the bulkiness of this type of twining. Luckily all worked out well.

Here's the interesting part. I was advised that if I was working both one-color and two-color in the same project I should treat the one-color twine as if it was a two-color twine, meaning, do extra twists as if it was two-colored. I didn't do this, and now I can see why I might want to do this. If you look closely at the photo, you can see that the two rows of white weft twining visually look different than the two-color weft twining. It does not bother me for this project, but again, it's interesting, and to note this difference when planning future projects.

.from left to right: basic twining, countered twining, two color twining, and macrame square knot.

Weaver-Speak: I am excited to do more two-color weft twining in the future and especially experiment with that little bead of color that can be produced by the twist. For this project, I made sure to tug the weft down to change colors, but it would be fun as a design element to use that "little bead" of color.

Lastly, and probably the most worrisome part of this project for me was what the heck to do with all the weft threads. Because I usually do 4 or 5 rows, a knot has been the way to go for me for it measures about the same as the band. But here, I felt a big knot or a bunch of smaller knots just wouldn't look right. I decided to try out a macrame square knot. Since this is the first time I've done this, I'm not sure if I will continue this way, but it felt like it worked for this project.

Oh, and I want to add that I did the weft twining under tension on my backstrap loom. There are lots of tidbits at Laverne's blog about weft twining, and if you want to learn how to do it, she had video tutorials here. Also, if you search the Ravelry Backstrap Weaving Group there is info/input to be gleaned there and project notes about twining.

Overall, I am happy with how it turned out, and I am building my skills for future projects!

Okay, now for the links: Weft Twining, and this book I got for $3 at amazon:

Taaniko, Maori Hand Weaving

This book has fantastic pictures if you are a visual learner!

The Chilkat Dancing Blanket. I did not use this as a source for weft twining, but these blankets are made with twining. This book is about the Tlingit of Yakutat, Alaska to Vancouver, BC that wove these robes. The book includes origin stories, fantastic photographs, and instructions on weaving. This book cost about $12 on amazon, and was worth every penny.

I've got a few project ideas brewing and new techniques to learn! See you soon :)


Related Posts Plugin for WordPress, Blogger...