Sunday

State Fair Sash 2015

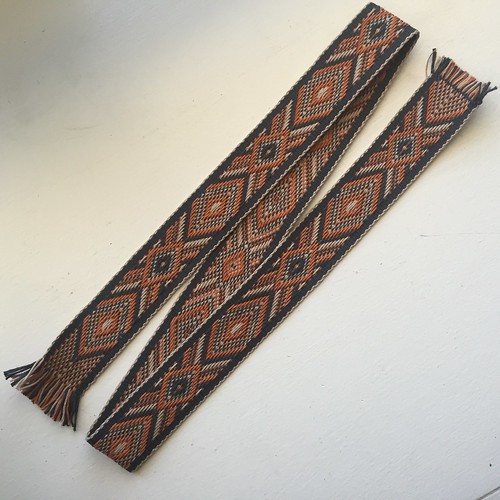
Pretty much last minute in August I decided to weave up a sash using my handspun yarns. I'd taken a break from weaving to spend the summer with my kids and this was kind of a reintroduction to getting back to weaving.

For over a year I have been spinning local New Mexican churro yarn. My original thought was I could build up my stash of finely spun local wool yarns to maybe use for tablet weaving or some on the inkle loom. But here's the catch, and I knew this but I still needed to try, churro wool is really good for weaving rugs or items that need strength such as bags. It's not a good choice for garments. But I thought, maybe I could weave it for items such as belts, trim, or sashes, since these items aren't worn against the skin and need strength.

So I started with spinning my usual singles. Fat singles, and skinny singles. I prefer to weave with handspun singles. But no joke, every time I wove with them it did not go well. First I started with my inkle loom. And holy moly, shredded yarn. Then I moved to tablet weaving, and yikes, sticky, sticky, sticky beyond belief. So I abandoned my handspun yarns for quite some time and needed to just think about what I was going to do with them.

Then in August, I decided to sit down and respin my singles almost to the point of being over spun, then I plied them firmly into a two-ply yarn. I washed and set the skeins and proceeded to do the same to a lone red skein from a local yarn shop that I obtained a few years back. I also grabbed a non-churro wool yarn I had spun, a variegated off white with flecks of brown and respun that too.

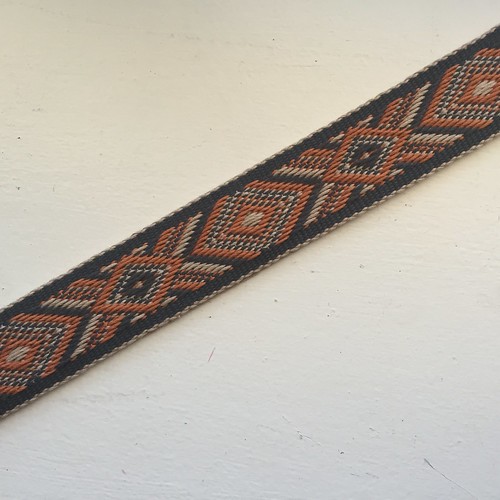
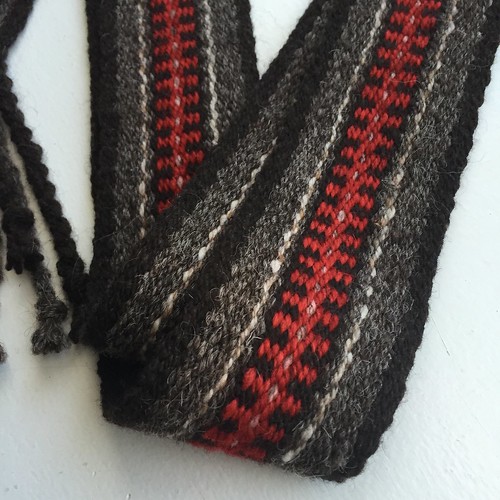
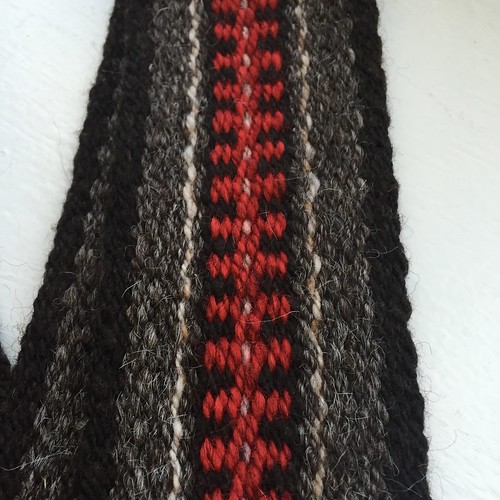
Now I had a collection of 3 colors of churro, and 1 color non-churro. And here began the magic for me. I am usually pretty meticulous about drawing out drafts to weave and doing samples to work to a specific size for width. But a pattern popped in my head, a simple one, using a "comb" design and I just sat down and fully warped my inkle loom to the max.

I was pretty sure the yarn would shred and I would end up wasting it like I had been doing (it quietly kills me to waste yarn). And I am not sure if I've ever completely winged it when it came to warping. I had no idea how wide this woven piece would become let alone if I could weave it.

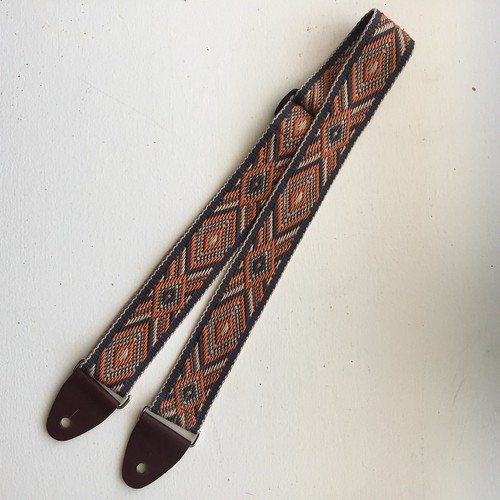
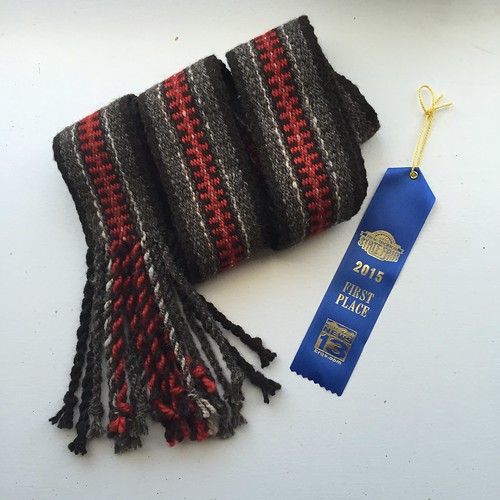
I used a thinner spun plied wool for the weft and behold, I was able to weave it. The sheds opened without much difficulty (advancing the warp was challenging). And I loved it! The simple comb design was just what I needed and it all came together much better than I could have expected. I finished the band, and twisted the fringes. I had a beautiful sash, strong and sturdy. An item that had simple beauty, but rugged enough to be used.

The thought entered my mind to enter it in the state fair. For me, entering a woven product was about complexity or something grand, but this sash didn't fit that bill. I wanted to enter it because all the wool was handspun (and a respun commercial skein), I had used local wools, my weaving was even with nice selvedges (edges), and I successfully used my handspun on the inkle loom without shredding. Not one warp broke or even showed signs of wear! I finally learned how I needed to spin my churro for weaving on the inkle loom.

So I entered it. And during my son's field trip to the state fair I dragged him to the creative arts building (my oldest son is pretty much completely not impressed with weaving, he is like, yeah mom, I've seen this a hundred times before). Even more crazy was I got a first place ribbon in my division! Wow! Coolest thing ever!

It was totally exciting to see that they appreciated exactly what I saw too. I really couldn't believe it! Anyhow, this sash is staying in my personal collection for the time being and now I am slowly working thru my churro roving stash, spinning heavy worsted weight two-ply yarns for weaving. I am hoping next year to go collecting local plants for dyeing (I completely missed doing that this year) some of my wool.

Lesson learned, weaving doesn't have to be super complex, and pattern challenged to produce something beautiful!

Details! The sash measures 108" (86" woven, 6" x 2 fringe). The width is 2 7/8".


3 Color Pick Up Weave


The finished guitar strap.

Something new and exciting has come along for small loom weavers, the beautiful 3 Color Pick Up Weave!

Woven with the second draft option.

My love of this weave actually started with this sash by Annie MacHale. There was something just a little different about it, I could see that there were 3 colors, but I couldn't quite grasp how it was made.

Over the weekend Annie published her tutorial on how to do 3 Color Pick Up Weave. The design possibilities are ENDLESS! Included in the tutorial are two different kinds of drafts and a video, which is awesome, seeing the weave in action.


This type of threading comes from a small province in Zanavykija, Lithuania. There are very few examples of this weave in one book about Lithuanian Sashes, and maybe one or two examples on the internet other than Annie's blog. It's a very rare weave not often seen.
So here are just a few samples that I have to share:

Woven in wool, with the first draft option.
First draft option.
First draft option.
For the guitar strap I just went for it, no pattern ideas in my head, I just started picking up and this is what I came up with!


Hop on over to Annie's blog (linked above) to read more about her tutorial, and the tutorial is available on Etsy (also linked above). I can't wait to see what everyone makes!

Lastly, the details! Woven on an inkle loom, 3 colors of cotton yarn, width 2", and length 49". I used a brown leather fob kit (from Annie) to finish it off!

Thursday

Greek Key Pick Up Draft

key fob with greek key pick up

Last week I published my Wristlet Tutorial on Etsy and I had a request about the woven band I used in the video tutorial. My inspiration for this pattern comes from my weaver friend Annie MacHale. With her permission I will post my draft here and you will need to visit her blog for the instructions.

Please note that this draft may or may not come out at 1" wide. It's a discussion that all of us have, how to weave to a specific size. The kicker is every weaver can warp on the same amount of yarn and each of us will get a different width. For instance, I weave using a backstrap set up or inkle loom, and when I set up the same project on each loom not only is my width different, my PPI (picks per inch) are different.

H = heddle shed, O = open shed

My advice is just to practice. It's taken me years of weaving with the same exact brands of yarns to be able to come close to guessing a predicted width. Also don't try to force the above pattern to fit 1", find where your 1" is, then add or subtract warps to the selvedge. It's a real bummer to weave to someone else's rhythm, find your own!

Lastly, the pick up sequence occurs with the 7 dark green and 6 yellow warps in the center of the draft.

Please visit Annie's blog by clicking here, not only does she have the written instructions there's also a video.

If you make anything with this draft, I would LOVE, LOVE to see your work. Email me rabbitbrushstudio at yahoo dot com or visit my Facebook and post your picture there!

Enjoy!


Tuesday

Wristlet Tutorial Done!

how to make a wristlet key fob

Hey folks! I think I might be making my way back to my creative pursuits. As many of you know, I often say "maybe" because of these two cuties below:

We had a series of medical issues at the start of the summer that had me stepping away from crafting. I was able to finish a few started projects, and I made a sash at the last minute that went to state fair (more on that in another blog post soon), but otherwise I had to basically stop all extracurricular activities! It's all good now, or I should say stable, so I'm going to try to do some catch up.

Often, I would post a photo of a key fob I made and people would ask me how I made it. Unfortunately I would give "half" answers. Mostly because it took me a couple years to get them just perfect! I really admire a well woven fabric, but if it's not put together beautifully it makes a so-so project.

I decided it was time to make my first online tutorial for sale with all my tricks and tips. Key fobs make wonderful gifts. I've also donated a few for auction, and happily they get the right amount of bids for their worth! You can make key fobs for guys, gals and kids, just by changing the colors!

The most exciting part for me is making fobs from inkle-woven, tablet-woven, and backstrap-woven bands. What ever your weaving style/method, you can turn it into a fob! In fact, I am guessing you could make key fobs from webbing or fabric too.

Aside, from the PDF tutorial, I decided to include a video that really shows the whole process from beginning to end. I was really nervous, because it was the first time I put together a video like this, but it's gotten great reviews. Whew!

The tutorial includes:

Part One: Supplies & Written Instructions

Part Two: Photo Tutorial With Written Instructions

Part Three: Resources & Links

Part Four: Instruction To Access An Online Video (9:18 minutes)

Part Five: Tips On Weaving Bands For Key Fobs

What I decided not to include is how to weave! But I do offer suggestions about how to go about planning for weaving specific sizes based off my experiences.

Please enjoy the tutorial, and even better, send me a photo of your finished product. I would love, love to see what you end up making!

At this time, the tutorial is only available at Etsy, and it's instant download!

I am slowly working on another tutorial, and this time it'll be about weaving, so stay tuned for that some time in the near future.


Wednesday

Nålbinding: Socks Revisted

I found some of my notes on what I did making my socks! In the last post, I just quickly posted the pictures but didn't add my usual goals list, or any information. I'm here to do that now!

Goals for this project:

1. Make a pair of socks!

2. Sample some stitches and decide which one to use.

3. Practice round/spiral start, increasing and decreasing.

4. Ask, did I enjoy Nålbinding? Would I make another pair? What would I do differently?

So, those were my goals. It was a short list because I knew nothing about Nålbinding. What intrigued me was photos of beautifuls mittens and socks made with just a wooden needle and yarn.

As I started my online research, it became clear that the bulk of people doing Nålbinding came to it because they do living history. My interest in this goes as far as thinking about my husband's Viking ancestors, and the surge in Viking history in general. The challenge for me was the thought of making a pair of socks with just a wooden needle! I have made many pairs of socks with 5 double pointed needles and/or 2 or 1 circular needle. This process makes for a very portable project, but could I literally put a wooden needle and some yarn in my bag, and that's all?

Then I saw a picture on Pinterest!

Surprisingly, I'd visited the woman's blog many times before, but for tablet weaving!

The picture that got me started was a pair of knee highs by Mervi Pasanen! They were beautiful! It's worth checking out her blog as there are other photos of Nålbinding goodies, and I even think there is a tutorial on edging. Anyway, her photo inspired me to make a pair!

And when I say a pair, I meant just socks that came up over my ankle.

And, I think it was Mervi's blog that led me to Neulakintaat website (at this time I don't know the name of the woman who runs the site, but when find out, I will add her name here). There is a TON of information there, and links to YouTube videos.

I practiced the round/spiral start with different yarns in my stash and settled on using Brown Sheep Yarn, 100% wool, worsted weight. I also made the decision to make both socks at the same time, as I have learned from knitting that gauge can change every time you put down and pick up your knitting.

I only tried 2 stitches, Finnish 2+2, and Finnish 1+2 also know as the Mammen Stitch. I am one of those people that can sample forever, and this time I really just wanted to get started. I used stitch markers, which "traveled" due to the spiral nature, will have to figure that out at a later date.

Basically, I started with the round/spiral start with increases, tried on the sock, and continued doing increases here and there until I reached the arch area. I added yarn using spit slicing. I stitched half way across, then added an equal amount of thumb stitches and rejoined.

Continuing along, I worked the lower and upper leg with a few decreases and plenty of increases. After that, I went back to do the heel, working a round/spiral decrease. Originally I wanted standard socks, but had enough yarn to keep going.

I started the socks on 16 November 2014 and finished them 9 January 2015.

What I learned:

I absolutely love Nålbinding!

The fabric is dense and warm. Nålbinding does not stretch widthwise, but it does lengthwise, so this would need to be taken in consideration if you were felting the fabric as seen mittens.

I don't really love the heel, it is sort of a Heel Type A but not as noted at Shelagh Lewins site. And as I read online, they are tight thru the ankle while putting them on. I don't really think there is much to do about that. Next time I will either try Heel Type A (adding on the heel cup) or Heel Type E.

I am planning on doing another pair of socks with a different heel and a pair of fingerless mittens!

Note: Also saw on Mervi Pasanen's blog that she will be coming out with a book about Nålbinding, I know it's in Finnish, but hoping there might be some English???

Resources:

These really cool knee highs

Mervi Pasanen's Knee High Socks

Nålbinding Thread Mervi Pasanen's Blog

Neulakintaat Round/Spiral Start - Video

Neulakintaat Mammen/Korgen/Finnish 1+2 Stitch - Video

Neulakintaat Increasing/Decreasing - Video

Neulakintaat Ending/Finishing Edge - Video

Spit Splicing

Shelagh Lewins Heel Type/Construction Page - Heel Type A

Neulakintaat Website


Related Posts Plugin for WordPress, Blogger...